
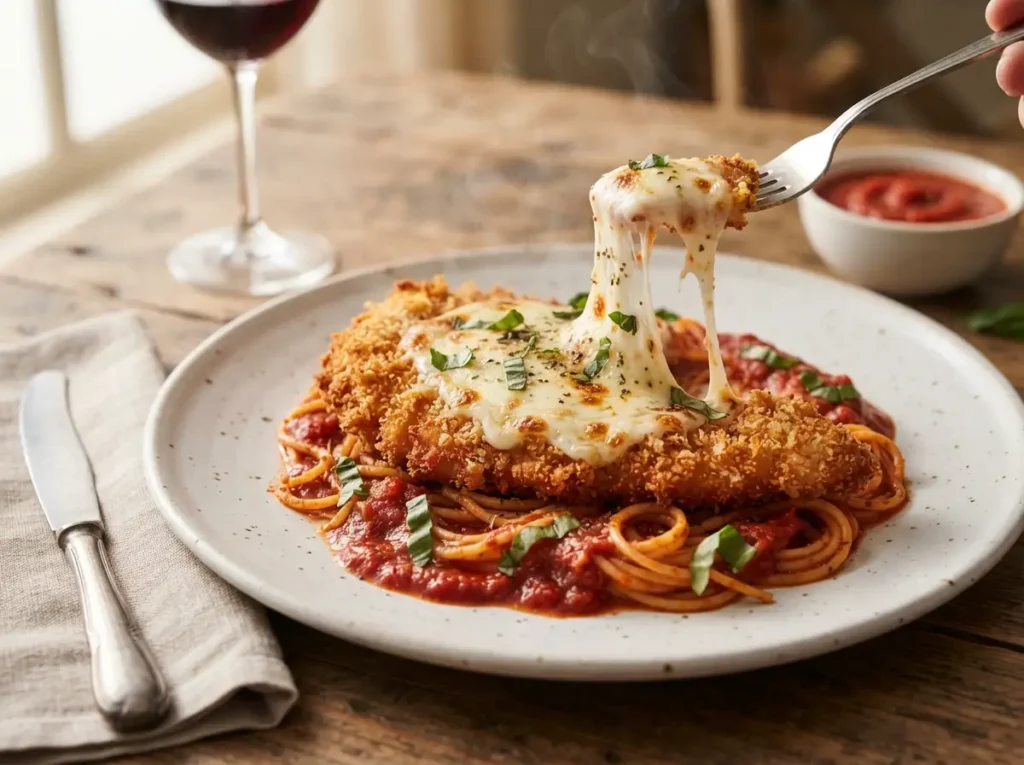
Crispy Baked Chicken Parmesan (Easy, Family-Friendly Dinner)
Chicken parmesan is a dinner everybody at the table is happy to see, but the classic version means a pan of hot oil, a splattered stovetop and a pile of dishes. This baked version keeps everything people love about it: a crunchy golden crust, juicy chicken inside, tangy marinara and a blanket of melted mozzarella. The oven does the work, and the whole thing cooks on one sheet pan in about 45 minutes.
The secret is a few small techniques: slicing the chicken thin so it cooks fast and evenly, toasting the panko for deeper color, and baking the cutlets on a wire rack so hot air reaches the bottom too. That rack is what keeps the underside as crisp as the top. Follow the steps below and you’ll get a crust that stays crunchy even under the sauce and cheese.
Why You’ll Love This Recipe
- Crispy without frying. No pan of hot oil and no splatter. The oven and a wire rack create the crunch.
- One sheet pan. Bread, bake, top and bake again, all on the same pan, so cleanup is quick.
- Ready in about 45 minutes. Most of that is hands-off oven time.
- Family friendly. Crunchy chicken, mild sauce and melty cheese is an easy win with kids and picky eaters.
- Easy to prep ahead. You can bread the cutlets earlier in the day and bake them when you’re ready.
What Is Chicken Parmesan?
Chicken parmesan, often called chicken parm, is an Italian-American classic: breaded chicken cutlets topped with tomato sauce and melted mozzarella, usually served over spaghetti. The traditional method pan-fries the cutlets. This baked version swaps the frying for a hot oven and a wire rack, so you get a similar crunch with far less mess.
What Does It Actually Taste Like?
Crunchy on the outside and tender and juicy inside, with a savory, nutty edge from the parmesan in the breading. The marinara adds a little tang and sweetness, the mozzarella is creamy and stretchy, and fresh basil on top keeps the whole plate from feeling heavy. Because the sauce goes only on the center of each cutlet, the edges stay crisp, which gives you both textures in every bite.
Baked vs. Fried Chicken Parmesan
Pan-fried chicken parm has a deeper, richer crust because the cutlets sit in hot oil, but it takes more attention, uses a lot of oil and splatters across the stove. The baked version trades a little of that deep-fried richness for convenience: you set the cutlets on a rack, put them in the oven and walk away. Toasting the panko first closes most of the gap, and many people find the baked crust lighter and easier to enjoy alongside a big plate of pasta.
Equipment You’ll Need
- A rimmed baking sheet and a wire rack that fits inside it
- A meat mallet or rolling pin, plus parchment or plastic wrap for pounding
- Three shallow dishes for the breading station
- A skillet for toasting the panko
- An instant-read thermometer (optional, but it takes the guesswork out)

Everything you need is simple pantry and fridge staples.
Ingredients
For the Chicken
- 2 large boneless, skinless chicken breasts (about 1½ to 2 lbs total)
- ½ tsp salt
- ¼ tsp black pepper
For the Crispy Coating
- 1½ cups panko breadcrumbs
- 2 tbsp olive oil, for toasting the panko
- ½ cup finely grated parmesan cheese
- 1½ tsp Italian seasoning
- ½ tsp garlic powder
- ½ tsp salt
- ¼ tsp black pepper
- ½ cup all-purpose flour
- 2 large eggs, beaten with 1 tbsp water
- Olive oil cooking spray (optional)
For the Sauce and Cheese
- 1½ cups marinara sauce, a thick, good-quality one
- 1½ cups shredded low-moisture mozzarella (about 6 oz)
- 2 tbsp grated parmesan, for sprinkling
- Fresh basil leaves, for serving
Ingredient notes and swaps
- Panko gives the crispiest crust. Regular breadcrumbs work, but the crust will be a little denser.
- Low-moisture mozzarella melts and browns best. If you use fresh mozzarella, pat the slices dry first.
- A thick marinara matters. A thin, watery sauce can soften the coating.
- Short on time? Buy chicken breast cutlets that are already sliced thin.
Instructions
- Heat the oven and set up the pan. Heat the oven to 425°F. Place a wire rack on a rimmed baking sheet and lightly spray the rack with oil so the cutlets don’t stick.
- Slice and pound the chicken. Lay one chicken breast flat, press your palm on top and slice horizontally through the middle to make two thin cutlets. Repeat with the second breast. Place the cutlets between sheets of parchment or plastic wrap and pound them to an even ½ inch. Pat dry and season both sides with ½ tsp salt and ¼ tsp pepper.
- Toast the panko. In a dry skillet over medium heat, stir the panko with 2 tbsp olive oil for 2 to 3 minutes until light golden. Pour it into a shallow dish, let it cool for a couple of minutes, then stir in the parmesan, Italian seasoning, garlic powder, ½ tsp salt and ¼ tsp pepper.
- Set up the breading station. Put the flour in one shallow dish, the beaten eggs in a second and the seasoned panko in a third, in a row.

Press the panko on firmly so it sticks to every side.
- Bread the chicken. Dredge a cutlet in flour and shake off the excess. Dip it in the egg and let the extra drip off. Press it firmly into the panko on both sides until fully coated. Set it on the wire rack and repeat with the rest.

The wire rack lets hot air reach the bottom, so both sides crisp up.
- Bake until golden. If you like, lightly mist the tops with oil spray. Bake for 15 to 18 minutes, until the crust is golden and the chicken is nearly cooked through.
- Add the sauce and cheese. Take the pan out of the oven. Spoon about 2 tbsp of marinara onto the center of each cutlet, then top with the mozzarella and a sprinkle of parmesan. Bake 5 to 7 more minutes, until the cheese is melted and bubbly and the thickest part of the chicken reaches 165°F.

Sauce in the center only keeps the edges crisp.
- Rest and serve. Let the chicken rest for 3 to 5 minutes. Top with fresh basil and serve with the remaining marinara, warmed, on the side.
Tips for Extra-Crispy Chicken Parm
- Pound the chicken to an even thickness. Uneven cutlets cook unevenly, and the thin parts dry out while the thick parts finish.
- Use a wire rack. Without it, the bottom sits in its own moisture and turns soft. The rack is the single biggest reason this recipe works.
- Toast the panko first. It gives the crust color and crunch that raw panko can’t get in the oven.
- Sauce the center only. Leaving the edges bare keeps a crisp border all the way around.
- Use a thick sauce. If yours is thin, simmer it for a few minutes first to reduce it.
- Use a thermometer. Chicken is done at 165°F. Pulling it at the right moment keeps it juicy.
- Don’t skip the rest. A few minutes lets the juices settle and the cheese set, so it slices cleanly.
Common Mistakes to Avoid
Most disappointing baked chicken parm comes down to three things. The first is skipping the wire rack and baking straight on the pan, which leaves the bottom crust soft and pale. The second is covering the whole cutlet in sauce, which steams the breading and turns the top soggy. The third is crowding the pan, so the cutlets trap steam instead of drying out and browning. Give each cutlet a little space, keep the sauce to the center, and use the rack, and you’ll avoid nearly every common problem.
Another easy slip is pressing the breading on too lightly. If the panko isn’t pressed firmly into the egg-coated chicken, patches of crust fall off in the oven. Take an extra few seconds to press it on with your palm and shake off any loose crumbs before the cutlet goes on the rack.

Crunchy crust, juicy chicken and stretchy melted cheese.
Variations to Try
- Air fryer: Cook the breaded cutlets at 400°F for 8 to 10 minutes, flipping halfway. Add the sauce and cheese and cook 2 to 3 minutes more until melted.
- Gluten-free: Use gluten-free panko and a gluten-free flour blend. The method stays the same.
- Chicken thighs: Boneless, skinless thighs pounded thin work well. Check that they reach 165°F, and add a few minutes if needed.
- Eggplant parmesan: Swap the chicken for thick eggplant slices that have been salted, rinsed and patted dry, and bake until tender.
- Chicken parm sandwiches: Tuck a cutlet into a toasted hoagie roll with extra sauce and cheese.
What to Serve With It
Spaghetti tossed in marinara is the classic partner. If you want something lighter, serve it with a crisp Caesar salad or arugula with lemon and olive oil. Roasted broccoli, green beans and garlic bread all work well too, and garlic bread is especially good for mopping up leftover sauce.
If you’re feeding a crowd or want a complete Sunday-dinner feel, put a pot of spaghetti on while the chicken bakes, toss a simple green salad with a sharp vinaigrette, and warm a loaf of garlic bread in the oven during the last few minutes of the cheese bake. Everything finishes at about the same time, and the table looks like a proper Italian-American dinner without much extra work.
Storage, Make-Ahead and Reheating
Refrigerate: Store leftovers in an airtight container for up to 3 days.
Reheat: Warm the cutlets on a wire rack in a 375°F oven for 10 to 12 minutes. The microwave works in a pinch, but it softens the crust.
Make ahead: Bread the cutlets up to a few hours in advance, set them on the rack and refrigerate them. Bake when you’re ready.
Freeze: Freeze breaded, uncooked cutlets flat on a tray, then move them to a freezer bag for up to 2 months. Bake from frozen, adding about 8 to 10 minutes, and check that the chicken reaches 165°F.
Frequently Asked Questions
How do I keep baked chicken parmesan crispy?
Use a wire rack, toast the panko before breading, put the sauce only on the center of each cutlet, and serve soon after baking. Those four steps do most of the work.
Can I make it in the air fryer?
Yes. Air fry the breaded cutlets at 400°F for 8 to 10 minutes, flipping once, then add the sauce and cheese and cook a few more minutes until melted.
Can I make it ahead?
You can bread the cutlets a few hours ahead and keep them chilled on the rack, then bake them when it’s time for dinner. They can also be frozen before baking.
What’s the best cheese for chicken parmesan?
Shredded low-moisture mozzarella melts and browns best, and a little parmesan on top adds flavor. Provolone is a good substitute for part of the mozzarella.
Can I make it gluten-free?
Yes. Swap in gluten-free panko and a gluten-free flour blend and follow the recipe as written.
Why is my chicken dry?
It’s usually because the cutlets were uneven or baked too long. Pound them to an even ½ inch, use a thermometer, and take the chicken out at 165°F.
What’s the difference between chicken parmesan and chicken parmigiana?
They’re the same dish. “Parmigiana” is the Italian-style name, and “parmesan” or “parm” is the common American name for it.
Do I have to pound the chicken?
It helps a lot. Slicing the breast in half makes cutlets thin, and pounding them to an even thickness means they cook at the same rate. If you skip pounding, make sure the slices are the same thickness and check the temperature before topping.
Can I use frozen chicken breasts?
Thaw them fully in the fridge first. Frozen chicken releases extra water and is hard to slice and bread, which can make the coating soggy.
More easy dinners: Try our 18 Easy One Pan Meals and 20 Easy Weeknight Dinner Ideas.

We’d Love to Hear From You!
Did you make this baked chicken parmesan? Tell us how it turned out in the comments below, and share any tweaks you made. We read every comment, and your tip might help the next person who makes it.