Chicken Parmesan Pasta (Crispy Chicken Meets Cheesy Pasta)

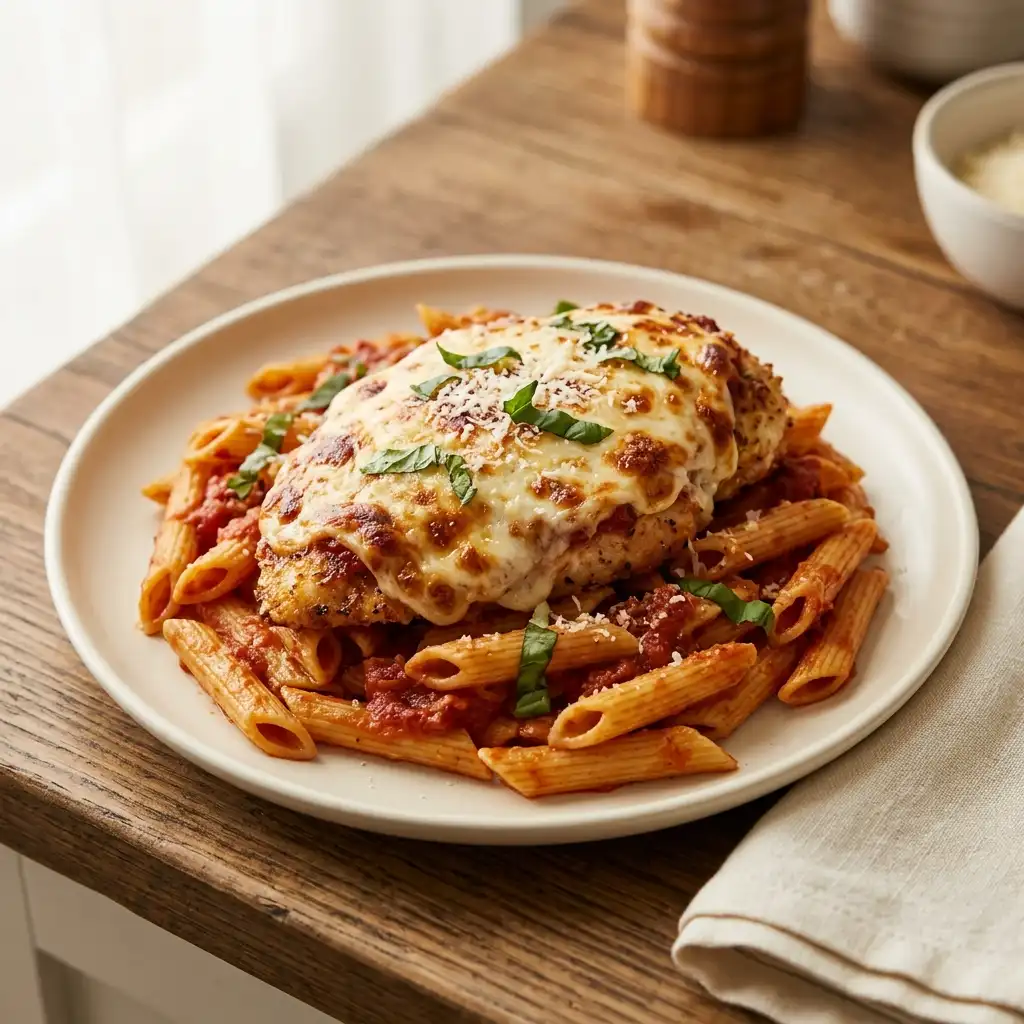
There’s a reason chicken parmesan has stuck around as a dinner-table favorite for generations, and putting it on top of a bed of marinara-tossed pasta only makes the case stronger. You get everything you love about the classic, that thick, craggy breadcrumb crust, tender chicken underneath, a bubbly layer of melted mozzarella, and a rich, garlicky marinara that ties every part of the plate together. This version leans on a few small techniques, resting the chicken on a rack instead of paper towels, slicing rather than serving it whole, tossing the pasta separately with its own share of sauce, that make a noticeable difference in the final result without adding much extra effort. It takes a little more hands-on time than a typical weeknight pasta, but almost none of it is difficult, and the payoff is a dinner that feels like something you’d order at a good Italian restaurant.
Why It Works
- Pounding the chicken to an even thickness before breading means every cutlet cooks at the same rate, so you’re not left with one piece overdone while another is still raw in the middle.
- Resting the fried chicken on a wire rack instead of paper towels keeps steam from getting trapped underneath, which is the difference between a crust that stays crisp and one that turns soggy within minutes.
- Tossing the pasta with its own portion of marinara, separate from what goes on the chicken, means the noodles are seasoned all the way through instead of just sitting under a pile of sauce.
- Slicing the chicken before plating exposes more of that crispy edge and makes the whole plate easier to eat, especially when it’s served family-style.
Worth Knowing
- Oil temperature matters more than it might seem. If it’s too cool, the breading soaks up oil and turns greasy instead of crisp; too hot, and the crust browns before the chicken finishes cooking through. Medium heat and a quick test with a pinch of breadcrumbs, which should sizzle steadily, is a reliable way to check.
- Watch the broiler closely once the mozzarella goes under it. The window between beautifully melted and burnt can be as short as 30 seconds, so it’s worth standing at the oven rather than stepping away.
- A splash of reserved pasta water goes a long way toward helping the marinara cling evenly to the noodles instead of pooling at the bottom of the bowl.
- If you’re making this for a crowd, the chicken can be breaded and fried a few hours ahead, then held at room temperature and broiled with the cheese right before serving.
Ingredients
- 1 lb penne pasta
- 2 boneless, skinless chicken breasts, pounded to even thickness
- 1/2 cup all-purpose flour
- 2 large eggs, beaten
- 1 cup breadcrumbs
- 1/2 cup grated parmesan, divided
- 2 cups marinara sauce, divided
- 1 1/2 cups shredded mozzarella
- 2 cloves garlic, minced
- Fresh basil, torn
- Vegetable oil, for frying
- Salt and pepper to taste
Step-by-Step Instructions

Set Up Your Breading Station
Start by setting up three shallow bowls in a row: one with seasoned flour, one with beaten egg, and one with breadcrumbs mixed with grated parmesan. Pound the chicken breasts to an even thickness first, about half an inch, so they cook evenly and stay tender. Then work each cutlet through the stations one at a time, flour first to help everything else stick, then a dip in the egg, then a firm press into the breadcrumb mixture so it’s coated on all sides. Taking the time to press the crumbs in properly here is what gives you that thick, craggy crust that crisps up so well in the pan.

Pan-Fry Until Deeply Golden
Heat a generous layer of oil in a skillet over medium heat, enough to come about a third of the way up the sides of the chicken. Once the oil is shimmering, lay the cutlets in carefully and let them fry undisturbed for about 4 minutes per side. Resist the urge to move them around too much, since that’s what gives you an even, deeply golden crust instead of a patchy one. You’re looking for a rich brown color and an audible crackle when you tap the crust with tongs.

Let the Chicken Rest on a Rack
Transfer the fried cutlets to a wire rack instead of a plate lined with paper towels. This one small detail matters more than it seems, since resting the chicken directly on paper towels traps steam underneath and softens the bottom crust. A rack lets air circulate all the way around, so every side stays crisp while the chicken rests for a few minutes and the juices settle back in.

Simmer the Marinara Sauce
While the chicken rests, warm the marinara sauce in a separate pan with a little minced garlic and a pinch of red pepper flakes if you like some heat. Let it simmer gently for about 10 minutes, just enough to deepen the flavor and take the raw edge off the tomatoes. This is also a good moment to taste and adjust, a small pinch of sugar can round out overly acidic canned tomatoes, and a few torn basil leaves stirred in at the end keep the sauce tasting fresh rather than flat.

Slice the Chicken
Once the chicken has rested, slice each cutlet into thick strips on a diagonal. Slicing rather than serving it whole does two things: it makes the finished dish easier to eat over pasta, and it exposes more of that crispy crust and juicy interior in every bite. You’ll notice the breading holds its crunch well here as long as it wasn’t left sitting on a damp surface earlier.

Top with Marinara and Mozzarella
Arrange the sliced chicken in a baking dish or oven-safe skillet, spoon a generous amount of the warm marinara over the top, and finish with a thick, even layer of shredded mozzarella. Slide it under the broiler for 2 to 3 minutes, watching closely the whole time, until the cheese is melted, bubbly, and just beginning to catch a little color at the edges. Broilers work fast, so it’s worth standing right there rather than walking away.

Toss the Penne with Marinara
While the chicken broils, cook the penne in salted boiling water until al dente, then drain and toss it directly with the remaining marinara sauce and a handful of grated parmesan. Save a splash of the pasta water before draining, since a little of that starchy liquid helps the sauce cling evenly to every piece instead of pooling at the bottom of the bowl.
Plate and Serve
Pile the marinara-tossed penne onto a plate or into a serving dish, then top it with the broiled chicken parmesan straight from the oven, mozzarella still bubbling. Finish with torn fresh basil and an extra dusting of parmesan if you like. Serve it right away while the cheese is still stretchy and the chicken is at its crispiest, this is one dish that’s genuinely best eaten the moment it hits the table.
Frequently Asked Questions
Can I bake the chicken instead of frying it?
Yes, breaded chicken can be baked at 425°F for about 20 to 25 minutes on a wire rack set over a baking sheet, flipping halfway through. It won’t develop quite the same deep golden crust as pan-frying, but it’s a lighter option that still holds up well under the marinara and cheese.
Why does my breading fall off the chicken?
This usually happens when the flour, egg, or breadcrumb layers aren’t pressed on firmly enough, or when the chicken is flipped too soon in the pan before a crust has had time to form. Let each cutlet fry undisturbed for the first few minutes on each side, and press the breadcrumbs on with your hands rather than just dipping.
Can I make this ahead of time?
The chicken can be breaded and fried a few hours ahead and held at room temperature, then topped with sauce and cheese and broiled right before serving. The pasta is best cooked fresh, since it can turn gummy if it sits tossed in sauce for too long.
How do I keep leftovers from getting soggy?
Store the chicken and pasta separately if you can, and reheat the chicken uncovered in the oven or air fryer rather than the microwave, which tends to soften the crust. A few minutes at 375°F will bring back most of that crispness.
Want a Full Week of Meals Planned Out for You?
Grab our Weekly Meal Plan and take the guesswork out of dinner, with easy recipes, shopping lists, and prep tips delivered straight to your inbox.
Get the Meal Plan